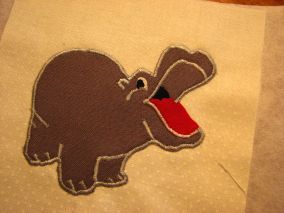
I have all the animals attached to the fabric so now I'm ready to stitch them on.
My friend L suggested I show exactly what I do to make these blocks so here goes:
1 - find a good image (since I can't draw that well); I use colouring pages I find on the internet and shrink or increase them in size as needed
2 - trace the image out on an adhesive product. I like Lite Steam A Seam 2 - it's tricky to find right now. If you want your image to be the same orientation as the original, trace from the wrong side of the image.
3 - adhere the steam a seam pieces to the fabric as needed. Then trim.
4 - layout the design. The steam a seam has a little tack to it so it will sit where I place it and is moveable until I iron it down. I use the original image as a guide to help with layout.
6 - add stitching lines to add definition - in this case it's the white chalk lines
7 - start satin stitching - I use a medium tear away stabilizer underneath to prevent waving. I use a bobbin weight thread (Wonderfil in this case) and a size 60 needle. I set my machine to zig zag with a stitch width of 2 and length of 0.2. I try to work from back to front in terms of depth - in this case I've done all the definition marks before going around the outside.
8 - some pictures of how close the needle is and how to do inside and outside curves. I set the needle to stop in the down position so I can move my fabric more easily. Going around tight curves is tricky and needs a lot of stop and start to keep the curve smooth.
9 - all finished - except the eye, throat, and tongue - and I might add a few teeth but not as many as the original picture - too fussy to do that. I'll do those when I have that colour thread in the machine. I use a little fray check on the back side to prevent the satin stitching from coming undone and try to overlap seams as much as possible to lock them in.
10 - Finally, tear away the stabilizer. I haven't done that yet because this guy isn't quite finished.
And there you have it. It looks a lot more complicated, when I see all the pictures, than it is to actually do it. It does take time and I like my results. The details add interest and make the little critters seem more alive
On a side note, I painted my front room this morning, had a shower, then went out for breakfast. Sometime when I wasn't watching my cat jumped onto the window ledge with fresh paint on it and she left kitty paw prints
thankfully the paint was only a bit tacky and not totally wet so nothing seemed to be stuck to her paws.
Later in the afternoon the kitty got up in her usual position
right where I'd painted - at least it was dry by this time.
I'm going to have to barricade this section tomorrow when I paint again so she doesn't get up there.