I was debating whether or not to quilt the melons in this quilt - most people I asked said yes - that's what I really thought too but there are 64 of them.
I tried a bunch of different ideas and finally settled on something simple that filled the space, was easy to mark, and echoed the other designs. A lot of people online used a lot of pebbles in this quilt and that's just not in my repertoire with my current machine.
I made myself another template and got to work. These went together really quickly and I have no issues quilting the melons.
My template (the straight lines align with the seam line down the middle)
My dots:
Finished:
The templates I made and used for this quilt have been simple but very effective and I'm really happy with how they turned out.
Showing posts with label techniques. Show all posts
Sunday, 14 June 2015
Tuesday, 2 June 2015
Remember to Blink
I took a quick break from my sister's wedding quilt (here, here, and here) this weekend to whip up a quilt for a baby shower. The parents-to-be are the brother and sister in law of my sister in law. I see them a lot at family gatherings and this is their first child - a cousin for my nieces.
I made them this quilt
Which is a pattern I borrowed from Buttons Quilts and it was super easy.
I quilted all straight lines, with the walking foot, doing stitch in the ditch down and across the sashing, then horizontal and vertical to match all the small squares - I ended up with a big grid of about 4" squares, interspersed with some 2" lines/squares. It looked good. If you look hard you can see the lines in the orange square.
I marked the lines using my hera marker - it just makes an imprint line in the fabric which I don't have to remove later - a total bonus given my tight timelines these days. It was pretty easy to see - it was an overcast day and that might have helped.
When I was quilting along the sashing, like here
and here
I had to keep reminding myself to blink - blinking helped keep me accurate I think. The pattern on the fabric is busy and almost mesmerizing too.
The label:
My nieces coloured the fronts of these cushions on our last crafternoon so that they would have something to give their new cousin. The backs of the pillows matches the back of the quilt.
The soon-to-be mommy loved them.
I made them this quilt
Which is a pattern I borrowed from Buttons Quilts and it was super easy.
I quilted all straight lines, with the walking foot, doing stitch in the ditch down and across the sashing, then horizontal and vertical to match all the small squares - I ended up with a big grid of about 4" squares, interspersed with some 2" lines/squares. It looked good. If you look hard you can see the lines in the orange square.
I marked the lines using my hera marker - it just makes an imprint line in the fabric which I don't have to remove later - a total bonus given my tight timelines these days. It was pretty easy to see - it was an overcast day and that might have helped.
When I was quilting along the sashing, like here
and here
I had to keep reminding myself to blink - blinking helped keep me accurate I think. The pattern on the fabric is busy and almost mesmerizing too.
The label:
My nieces coloured the fronts of these cushions on our last crafternoon so that they would have something to give their new cousin. The backs of the pillows matches the back of the quilt.
The soon-to-be mommy loved them.
Tuesday, 26 May 2015
Improving My Quilting
I've been on sabbatical since Feb 1 and have been sewing a lot - but not doing too much quilting.
Until now.
I've been working on a wedding quilt for my sister and it is a beast of a thing in terms of size and weight and I was struggling a bit with the quilting. Then I saw that Craftsy had a big sale on this past weekend so I picked up two of Angela Walters classes: Dot to Dot quilting and How Do I Quilt This?
I started with the Dot to Dot class because it was pretty short and I realized I don't want to be doing too much marking on this quilt.
Today I finished the stitch in the ditch on the quilt and started with the free motion designs. I followed some of Angela's ideas and incorporated a few of my own.
I decided on a simple design and made myself a template to help with the dot placement. I do like things even and well spaced.
My squares are about 4 1/2" wide so I started with a square that big and I marked off the diagonal lines:
The little ticky marks are about half way between the centre and the corner and 1/2" out from the centre line.
Then I cut it out and notched the ends and ticky marks. The ends I notched out to help with placement and centering. It worked great.
This is the first square I marked. See the 8 little blue dots? My other "dots" for quilting are the corners and the centre - I didn't mark those.
Then I did my first shape. It looks pretty good to me. I used a water soluble marking pen so a quick spritz with water and I was moving on.
On my next one I realized it was hard to hit the "dots" that weren't marked because they were a little hard to see (since they didn't really exist). So I added a few more marks - actual dots in all the places I need. I'm so happy with the results and I'm sewing right along.
Now, if my cat would only stay off the quilt while I'm quilting, I wouldn't have to drag her weight around with the quilt.
Until now.
I've been working on a wedding quilt for my sister and it is a beast of a thing in terms of size and weight and I was struggling a bit with the quilting. Then I saw that Craftsy had a big sale on this past weekend so I picked up two of Angela Walters classes: Dot to Dot quilting and How Do I Quilt This?
I started with the Dot to Dot class because it was pretty short and I realized I don't want to be doing too much marking on this quilt.
Today I finished the stitch in the ditch on the quilt and started with the free motion designs. I followed some of Angela's ideas and incorporated a few of my own.
I decided on a simple design and made myself a template to help with the dot placement. I do like things even and well spaced.
My squares are about 4 1/2" wide so I started with a square that big and I marked off the diagonal lines:
![]() |
| sorry for the bad lighting - I had the drapes pulled to try to keep it cool in the house - we're in a bit of a heat wave right now |
Then I cut it out and notched the ends and ticky marks. The ends I notched out to help with placement and centering. It worked great.
This is the first square I marked. See the 8 little blue dots? My other "dots" for quilting are the corners and the centre - I didn't mark those.
Then I did my first shape. It looks pretty good to me. I used a water soluble marking pen so a quick spritz with water and I was moving on.
On my next one I realized it was hard to hit the "dots" that weren't marked because they were a little hard to see (since they didn't really exist). So I added a few more marks - actual dots in all the places I need. I'm so happy with the results and I'm sewing right along.
Now, if my cat would only stay off the quilt while I'm quilting, I wouldn't have to drag her weight around with the quilt.
Sunday, 21 July 2013
Animal Parade Applique
I have all the animals attached to the fabric so now I'm ready to stitch them on.
My friend L suggested I show exactly what I do to make these blocks so here goes:
1 - find a good image (since I can't draw that well); I use colouring pages I find on the internet and shrink or increase them in size as needed
2 - trace the image out on an adhesive product. I like Lite Steam A Seam 2 - it's tricky to find right now. If you want your image to be the same orientation as the original, trace from the wrong side of the image.
3 - adhere the steam a seam pieces to the fabric as needed. Then trim.
4 - layout the design. The steam a seam has a little tack to it so it will sit where I place it and is moveable until I iron it down. I use the original image as a guide to help with layout.
6 - add stitching lines to add definition - in this case it's the white chalk lines
7 - start satin stitching - I use a medium tear away stabilizer underneath to prevent waving. I use a bobbin weight thread (Wonderfil in this case) and a size 60 needle. I set my machine to zig zag with a stitch width of 2 and length of 0.2. I try to work from back to front in terms of depth - in this case I've done all the definition marks before going around the outside.
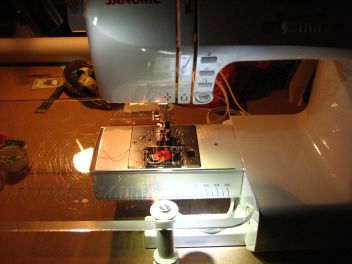
8 - some pictures of how close the needle is and how to do inside and outside curves. I set the needle to stop in the down position so I can move my fabric more easily. Going around tight curves is tricky and needs a lot of stop and start to keep the curve smooth.
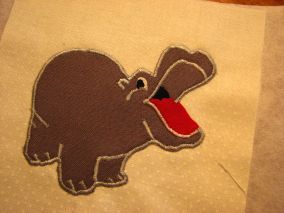
9 - all finished - except the eye, throat, and tongue - and I might add a few teeth but not as many as the original picture - too fussy to do that. I'll do those when I have that colour thread in the machine. I use a little fray check on the back side to prevent the satin stitching from coming undone and try to overlap seams as much as possible to lock them in.
10 - Finally, tear away the stabilizer. I haven't done that yet because this guy isn't quite finished.
And there you have it. It looks a lot more complicated, when I see all the pictures, than it is to actually do it. It does take time and I like my results. The details add interest and make the little critters seem more alive
On a side note, I painted my front room this morning, had a shower, then went out for breakfast. Sometime when I wasn't watching my cat jumped onto the window ledge with fresh paint on it and she left kitty paw prints
thankfully the paint was only a bit tacky and not totally wet so nothing seemed to be stuck to her paws.
Later in the afternoon the kitty got up in her usual position
right where I'd painted - at least it was dry by this time.
I'm going to have to barricade this section tomorrow when I paint again so she doesn't get up there.
My friend L suggested I show exactly what I do to make these blocks so here goes:
1 - find a good image (since I can't draw that well); I use colouring pages I find on the internet and shrink or increase them in size as needed
2 - trace the image out on an adhesive product. I like Lite Steam A Seam 2 - it's tricky to find right now. If you want your image to be the same orientation as the original, trace from the wrong side of the image.
3 - adhere the steam a seam pieces to the fabric as needed. Then trim.
4 - layout the design. The steam a seam has a little tack to it so it will sit where I place it and is moveable until I iron it down. I use the original image as a guide to help with layout.
6 - add stitching lines to add definition - in this case it's the white chalk lines
7 - start satin stitching - I use a medium tear away stabilizer underneath to prevent waving. I use a bobbin weight thread (Wonderfil in this case) and a size 60 needle. I set my machine to zig zag with a stitch width of 2 and length of 0.2. I try to work from back to front in terms of depth - in this case I've done all the definition marks before going around the outside.
8 - some pictures of how close the needle is and how to do inside and outside curves. I set the needle to stop in the down position so I can move my fabric more easily. Going around tight curves is tricky and needs a lot of stop and start to keep the curve smooth.
9 - all finished - except the eye, throat, and tongue - and I might add a few teeth but not as many as the original picture - too fussy to do that. I'll do those when I have that colour thread in the machine. I use a little fray check on the back side to prevent the satin stitching from coming undone and try to overlap seams as much as possible to lock them in.
10 - Finally, tear away the stabilizer. I haven't done that yet because this guy isn't quite finished.
And there you have it. It looks a lot more complicated, when I see all the pictures, than it is to actually do it. It does take time and I like my results. The details add interest and make the little critters seem more alive
On a side note, I painted my front room this morning, had a shower, then went out for breakfast. Sometime when I wasn't watching my cat jumped onto the window ledge with fresh paint on it and she left kitty paw prints
thankfully the paint was only a bit tacky and not totally wet so nothing seemed to be stuck to her paws.
Later in the afternoon the kitty got up in her usual position
right where I'd painted - at least it was dry by this time.
I'm going to have to barricade this section tomorrow when I paint again so she doesn't get up there.
Tuesday, 23 October 2012
TTT - Twirling Seams
I've had a busy week and weekend and didn't think I'd have anything to post this week (much like last week). Then I decided I'd sew a little tonight to finish my Dear Jane homework and realized I could TTT about twirling seams. Here goes...
Twirling seams flattens out some of your seams and so reduces bulk in a four square patch. Here's what I did on a Dear Jane triangle block.
1. Press your seams all toward the dark - in this case, the green.
2. Then, sew another piece to the first one. If you always press the fabric the same way (in this case, towards the dark), then your seams will nest together nicely and you get better points.
3. You need to pick out the 2-3 stitches on your vertical seam that are in the seam allowance of your horizontal seam (blue arrow). The pink arrow is the vertical seam. You will pick out stitches directly above (north) of the intersection of the arrows. Pick them out on both sides of the fabric.
4. This is where I used to get messed up. Open up your fabric. The seams will fall open in the way they will want to lay (sometimes you have to help them a little).
If you look where they fall open, they make a sort of square out of the two colours of the fabric - in a checkerboard pattern.
5. Press. I press this seam from both sides because I think it lays flatter.
Here's my finished Dear Jane triangle
When I first learned this technique it took me a while to figure it out. Practice on some scraps. Once you get it, you'll love it!
Twirling seams flattens out some of your seams and so reduces bulk in a four square patch. Here's what I did on a Dear Jane triangle block.
1. Press your seams all toward the dark - in this case, the green.
| right side of fabric (please excuse the bad lighting) |
| wrong side of fabric with seams pressed towards the dark (green) |
3. You need to pick out the 2-3 stitches on your vertical seam that are in the seam allowance of your horizontal seam (blue arrow). The pink arrow is the vertical seam. You will pick out stitches directly above (north) of the intersection of the arrows. Pick them out on both sides of the fabric.
4. This is where I used to get messed up. Open up your fabric. The seams will fall open in the way they will want to lay (sometimes you have to help them a little).
| Starting to fall open |
| I helped them fall open |
| You can fingernail press along the seam to help |
5. Press. I press this seam from both sides because I think it lays flatter.
Here's my finished Dear Jane triangle
| back side of the triangle |
![]() |
| back side of another twirled seam square |
Tuesday, 9 October 2012
TTT - Padded Hangers
I have a little extra padding - I wish it was as easy to move around as this hanger padding.
I think I got this idea from pinterest - maybe not - I do know it's not an original idea. I love it though!
1. Go to your local home supply store - I went to Home Depot.
2. Find the foam insulation in tubes that goes around pipes. It's probably in the plumbing section. It's the insulation you put around the pipes of your hot water heater. It's dirt cheap - maybe $2 a piece.
3. Buy some.
4. Cut with scissors to the length of your hanger. This insulation has a sticky piece to close the tube - I left the plastic on there so it didn't get "sticky goop" all over my fabric.
These are great if you have heavy projects to hang or ones that will hand a long time. You don't get a bad crease in them from regular hangers.
Happy Quilting!
I think I got this idea from pinterest - maybe not - I do know it's not an original idea. I love it though!
1. Go to your local home supply store - I went to Home Depot.
2. Find the foam insulation in tubes that goes around pipes. It's probably in the plumbing section. It's the insulation you put around the pipes of your hot water heater. It's dirt cheap - maybe $2 a piece.
3. Buy some.
4. Cut with scissors to the length of your hanger. This insulation has a sticky piece to close the tube - I left the plastic on there so it didn't get "sticky goop" all over my fabric.
These are great if you have heavy projects to hang or ones that will hand a long time. You don't get a bad crease in them from regular hangers.
Happy Quilting!
Tuesday, 2 October 2012
TTT - Bendy Bright Light
Some weeks I think if it weren't for this weekly post I wouldn't get anywhere near my blog - and therefore, no where near the sewing machine.
I got this handy-dandy little light probably 4 or 5 years ago. I love it! Just after I got it, when I went to quilt classes, people would ask about it. I happily told them how much of a difference it made to my sewing. Finally, I could see much better than before.
So many of us sew in spaces that don't have great lighting. I'd love a second floor sewing room with tons of natural light - I should dream on, unless I win the lottery or marry a lot of money! Having great light is important so that we can see what we're doing, and sew into the wee hours of the night, if necessary.
This light attaches with sticky stuff to the side or top of your machine. You can remove the light - you press on the level that's at about 1:00 (in the above photo) and you can slip out the light and cord. I only do this when I take my machine in for servicing. The sticky stuff hasn't come unstuck in all the years I've had the machine. I've also seen replacement brackets - I'd get that if I was switching the light between machines.
The light is LED and should last thousands of hours. I think I paid around $40-$50 for the light - I do know I got it on sale, so I think around $50 is the going rate. It's totally worth it in my opinion.
The arm adjusts so that you can place the light wherever you want.
Happy sewing!
I got this handy-dandy little light probably 4 or 5 years ago. I love it! Just after I got it, when I went to quilt classes, people would ask about it. I happily told them how much of a difference it made to my sewing. Finally, I could see much better than before.
So many of us sew in spaces that don't have great lighting. I'd love a second floor sewing room with tons of natural light - I should dream on, unless I win the lottery or marry a lot of money! Having great light is important so that we can see what we're doing, and sew into the wee hours of the night, if necessary.
This light attaches with sticky stuff to the side or top of your machine. You can remove the light - you press on the level that's at about 1:00 (in the above photo) and you can slip out the light and cord. I only do this when I take my machine in for servicing. The sticky stuff hasn't come unstuck in all the years I've had the machine. I've also seen replacement brackets - I'd get that if I was switching the light between machines.
The light is LED and should last thousands of hours. I think I paid around $40-$50 for the light - I do know I got it on sale, so I think around $50 is the going rate. It's totally worth it in my opinion.
| light on |
| light off |
Happy sewing!
Tuesday, 25 September 2012
TTT - Starch
Back again - the week goes around pretty quickly around here. The new blogger interface finally appeared on my blog - I've been avoiding installing it until I was forced to. I'm sure I'll figure it out.
Today I want to talk about starch. I really like starch. It's changed my quilting life.
I pre-wash everything, probably because I started sewing clothing and there you have to pre-wash/pre-treat all your fabric. I also worry that colours will run - which has happened to me - thankfully in the pre-wash stage. I also like the fact that if there is going to be shrinkage in any way it happens before all the sewing work.
Anyway, when you/I pre-wash I take the sizing out of the fabric - that's the stuff the manufacturer adds to fabric to make it sort of stiff and have body. I add some back in with starch because I prefer to sew with a little body in the fabric. After I've pre-washed and dried (in the dryer) I iron/press my fabric. If I'm using the fabric right away, I give it a light starch when pressing; if the fabric is going in the stash, I don't starch it until I use it.
Another great thing about starch is it helps relax the fabric a bit so you can get the wrinkles out. My Dear Jane blocks lay really flat partly because I starch them when I'm finished (and all the fabric has a light starching before sewing).
Mostly I use this starch which I get at my local grocery store (Loblaw's)
It was recommended to me by my local quilt shop owner when I made a lone star quilt for my cousin
which had a lot of bias edges and the starch would help to reduce stretching.
I like that's it's not too heavy, is very reasonably priced (under $4 a can), and is easy to find. It also flakes minimally. I think this company makes a heavier starch in a purple can but I've never tried it.
Some people say moths are attracted to starch - I don't know. I have never had a moth problem.
In the spring I bought some of this at a quilt show
because it was on sale there. I got mixed reviews on it from other quilters but thought I'd try it. It has it's place in quilting - and since the bottle is nearly empty I've clearly used it - but I don't use it very often. I like that it's really light - almost too light for my taste. It's also pretty expensive at around $12 a bottle. It flakes now and then. The smell is kinda iffy - it's scented which bothers some people. It is a non-aerosol can.
I did some applique on my Dear Jane quilt and used the blue starch - it worked excellently for that type of job.
I think the most important thing to remember about starch is to not over do it.
Today I want to talk about starch. I really like starch. It's changed my quilting life.
I pre-wash everything, probably because I started sewing clothing and there you have to pre-wash/pre-treat all your fabric. I also worry that colours will run - which has happened to me - thankfully in the pre-wash stage. I also like the fact that if there is going to be shrinkage in any way it happens before all the sewing work.
Anyway, when you/I pre-wash I take the sizing out of the fabric - that's the stuff the manufacturer adds to fabric to make it sort of stiff and have body. I add some back in with starch because I prefer to sew with a little body in the fabric. After I've pre-washed and dried (in the dryer) I iron/press my fabric. If I'm using the fabric right away, I give it a light starch when pressing; if the fabric is going in the stash, I don't starch it until I use it.
Another great thing about starch is it helps relax the fabric a bit so you can get the wrinkles out. My Dear Jane blocks lay really flat partly because I starch them when I'm finished (and all the fabric has a light starching before sewing).
Mostly I use this starch which I get at my local grocery store (Loblaw's)
It was recommended to me by my local quilt shop owner when I made a lone star quilt for my cousin
which had a lot of bias edges and the starch would help to reduce stretching.
I like that's it's not too heavy, is very reasonably priced (under $4 a can), and is easy to find. It also flakes minimally. I think this company makes a heavier starch in a purple can but I've never tried it.
Some people say moths are attracted to starch - I don't know. I have never had a moth problem.
In the spring I bought some of this at a quilt show
because it was on sale there. I got mixed reviews on it from other quilters but thought I'd try it. It has it's place in quilting - and since the bottle is nearly empty I've clearly used it - but I don't use it very often. I like that it's really light - almost too light for my taste. It's also pretty expensive at around $12 a bottle. It flakes now and then. The smell is kinda iffy - it's scented which bothers some people. It is a non-aerosol can.
I did some applique on my Dear Jane quilt and used the blue starch - it worked excellently for that type of job.
I think the most important thing to remember about starch is to not over do it.
Tuesday, 18 September 2012
TTT - Squaring up your fabric before cutting
I kinda feel like I've planned out these TTT backwards - oh, well. If somebody learns something, that's awesome.
Today I'm going to talk about squaring up your fabric before you start cutting. If your fabric is squared on the grain of the fabric, your quilt will lay flatter and you'll have fewer distortions.
Notes of caution: I always pre-wash my fabric before cutting or sewing (unless I use pre-cuts like jelly rolls or charm packs; which I've yet to use anyway) to avoid accidents like colour bleed or shrinking. I always buy a little more fabric than I need to allow for squaring up - I have seen cheap fabric go off grain by up to 10cm. With printed fabric, especially something with stripes or plaids, you sometimes lose your stripe or plaid if you square your fabric to the grain - then it's your choice about whether to square the fabric or cut to the printed pattern. I seldom buy stripes or plaids for that reason, but if I do have them, I use them sparingly and not in the borders unless I'm sure they're on straight of grain (I had this problem with some of my Dear Jane fabrics and for them I cut to the printed pattern to maintain the plaids as much as possible). If you rip your fabric to get a straight edge - it doesn't always leave you on the straight of grain so be careful. I ripped the red to get a manageable size and it's off - as you see in the photos. The white I'm using I also ripped and it's not off grain as much as the red. I find the cheaper the fabric, the more it rips crookedly.
Step 1: Wash and press your fabric if that's your plan. Then, match up the selvages (the finished ends, not the ones you cut) of your fabric. I hold my hands about 1/2 yard apart and grip the fabric like this:
Thumb towards me, then the front layer of fabric, then pointy finger, then back layer of fabric, then middle finger.
You match up the edges of the fabric, not the corners.
2. Wiggle and manoeuvre your fingers until your fabric hangs straight down with no ridges or bumps:
Thanks Mom for holding the fabric.
3. Once you get rid of your ridges, carefully lay your fabric on your cutting surface.
4. Now you need to trim the fabric to get a straight line. Use a long ruler and lay it straightly and evenly along the FOLDED edge of your fabric. I will cut on the right side of the ruler - I need the 6" of ruler to lay along the fold to help me be straight.
5. Move the ruler left or right until you can get a straight line through all your layers.
6. Cut - with some pressure (but not too much) and a sharp blade. Press evenly all the way along and put pressure on the ruler so it doesn't shift.
7. When I cut the rest, I turn the fabric around so that the fold is away from me (at the top) and line up the ruler so that I'll cut along the right edge. The fabric covered by the ruler is my 1 3/4" strip that I need. I'm right handed - if you're left handed, you should still align your fabric so that the measured part you are cutting is under the ruler.
These are all the photos I took so this must be the end of the tutorial. This tutorial also talks about cutting accurately.
Happy sewing!
Today I'm going to talk about squaring up your fabric before you start cutting. If your fabric is squared on the grain of the fabric, your quilt will lay flatter and you'll have fewer distortions.
Notes of caution: I always pre-wash my fabric before cutting or sewing (unless I use pre-cuts like jelly rolls or charm packs; which I've yet to use anyway) to avoid accidents like colour bleed or shrinking. I always buy a little more fabric than I need to allow for squaring up - I have seen cheap fabric go off grain by up to 10cm. With printed fabric, especially something with stripes or plaids, you sometimes lose your stripe or plaid if you square your fabric to the grain - then it's your choice about whether to square the fabric or cut to the printed pattern. I seldom buy stripes or plaids for that reason, but if I do have them, I use them sparingly and not in the borders unless I'm sure they're on straight of grain (I had this problem with some of my Dear Jane fabrics and for them I cut to the printed pattern to maintain the plaids as much as possible). If you rip your fabric to get a straight edge - it doesn't always leave you on the straight of grain so be careful. I ripped the red to get a manageable size and it's off - as you see in the photos. The white I'm using I also ripped and it's not off grain as much as the red. I find the cheaper the fabric, the more it rips crookedly.
Step 1: Wash and press your fabric if that's your plan. Then, match up the selvages (the finished ends, not the ones you cut) of your fabric. I hold my hands about 1/2 yard apart and grip the fabric like this:
Thumb towards me, then the front layer of fabric, then pointy finger, then back layer of fabric, then middle finger.
You match up the edges of the fabric, not the corners.
2. Wiggle and manoeuvre your fingers until your fabric hangs straight down with no ridges or bumps:
| This one is good, no ridges or bumps running on the diagonal and the folded edge on the bottom is even. |
![]() |
| This one is even worse - see the ridge above the arrow? See how the folded edge is uneven on the left side? |
3. Once you get rid of your ridges, carefully lay your fabric on your cutting surface.
4. Now you need to trim the fabric to get a straight line. Use a long ruler and lay it straightly and evenly along the FOLDED edge of your fabric. I will cut on the right side of the ruler - I need the 6" of ruler to lay along the fold to help me be straight.
5. Move the ruler left or right until you can get a straight line through all your layers.
| At the selvage edge I'm off by close to an inch. The ruler is along the edge of the top layer of fabric to help you see. |
| This is how much I'm off at the folded edge - not too much |
| The fold is towards me (at the bottom) and I'll cut along the right hand side of the ruler. |
These are all the photos I took so this must be the end of the tutorial. This tutorial also talks about cutting accurately.
Happy sewing!
Subscribe to:
Posts (Atom)