Showing posts with label applique. Show all posts

Tuesday, 5 April 2016

I Finished!

On Easter Sunday I finished sewing the binding on my Under The Stars quilt.


I'm very pleased with how it turned out.

Some quilting close ups of the borders. I used the snowflakes I used on my HO, HO, HO quilt and added some loop-de-loops in between to join them together.


Around the squares in the centre I went horizontally and vertically row by row, and I went around each gold star.

In the dark blue band at the top I did a simple loop-de-loop again. I also quilted around the snowmen shapes and the big parts of their faces. Without that, they poofed up too much. With quilting the parts, there is much better definition to their faces.


I put a round label on the back that says: "Made by me, for me, then my name and the date".

I'm not sure I'd make this quilt again, or if I'll do another flannel top and bottom. I did like the mix of hand applique and sewn piecing. And the colours grew on my over time. On my current machine, quilting through two layers of flannel and batting was a bit tricky.

I've put this quilt away until next year when I'll bring it out for the couch. I refuse to accept that we have enough winter left that I still need a flannel quilt.

Sunday, 21 February 2016

Animal Parade - A Finished Quilt

This quilt is for my youngest niece who is now 6. I started it when she was 2 - I'm a bit slow it seems. K is a darling girl who is happy all the time and often says "today was a perfect day". She wanted animals on her quilt, so that's what she got. Her mom picked out the fabrics. On Canada Day, the year K was 2, I was asking her what animals she wanted on her quilt. She didn't really know. So my Mom, who is not a sewer, started giving her ideas - I would not have attempted some of these animals if it weren't for K wanting them.

Some progress shots of quilting:
This is how I mark my quilts usually - I trace or draw a design on the paper on the doctor's examining table, then sew over it. Then I rip it out. It's a bit tedious at times, but I find it accurate and never have to worry about marks showing.

My binding helper

Still helping with the binding

The Label, v 2.0; the first label had a missing word that I only noticed when I was sewing on binding. I tried fixing it but didn't like how it looked, so I made a new label.


The finished product, with K peeking around the corner.


I really enjoyed making this quilt and I enjoyed quilting it. K loves it and was snuggled under it the first night she got it.
It`s about 48 x 62, my own design.

Sunday, 20 December 2015

HO HO HO

I just finished this table runner for myself. I think I'm in love.
I like whimsical and this fits the bill. When I saw this in my local LQS I bought it immediately, and I have other fabrics from the line to make myself a quilt of some kind. I have a few ideas but can't seem to commit to a design. Something will come to me I'm sure.


This is the overall shot. The fabric line is called Ho Ho Ho, but I don't remember the designer. This pattern comes from a book that uses this fabric line.

I quilted straight lines in the green borders and around each letter and shape. Then I added some snow flakes - I'm very proud of them. Each snowflake is different.


I used my usual method of tracing a design onto the paper on the table at the doctor's office. Then I quilt it and tear off the paper.

This is a good example of selfish sewing for me. There will be more of this in my future - I'm naming 2016 as my year of selfish sewing - more on that later.


Monday, 26 January 2015

Little Winter Birdy

My quilt guild has a show every other year in the spring. This year when it's on I'll be out of the country so I'll miss it. One of the things they do is have guild members make mini quilts that they raffle off. Since I won't be able to help with the actual event I decided to make a mini quilt for them.

This little guy comes from a book called A Critter Christmas which I picked up at my LQS. The animals are pretty cute and my nieces are still at the age where they like cute.

My progress:

These are my freezer paper templates

This is the branch and leaves. I don't know why it's sideways - you'll have to tip your head cuz I can't rotate it.

This is round one. I didn't flip the direction of the bird from the templates and so he faces right - I like him facing left. And if you look closely you can see that my curves aren't very smooth because I clipped them.

So, I tried again. Instead of clipping the curves I did a running stitch and gathered them before starching and pressing. I'm much happier with this method and the results.

Almost finished

All Done. I quilted around the shapes, added an eyeball and pompom and a hanging sleeve.
I'm pretty pleased with my results and hope someone is happy to win this little winter birdy.

Monday, 2 September 2013

Design Wall Monday

Hi ho, hi ho, it's back to school I go - well, tomorrow at least.

Here's my Dear Jane progress - Row C

Row C
 Here's the block I finished tonight - C5. This has 17 pieces and 3 layers! It was a lot of applique.

C5
First I made 2 identical pinwheel blocks to make the very inner circle and the "bumps" in the next round. This is the freezer paper I used to make the inner circle, to applique onto the background.

Getting ready to applique...

To get the outside section, I made a "window" out of white, then appliqued it on - this is how I got the 3 layers. I also trimmed away excess in each layer as soon as I finished appliqueing.

Check out everyone's design walls here.

Monday, 12 August 2013

Design Wall Monday - Animal Parade

I just finished the final animal block for my niece's quilt - and since it's still Monday, I'm going to post it to Design Wall Monday.

I'm really happy with the way these turned out.


Sadly, I have to take this quilt down for now and get working on my Dear Jane or I won't have my summer homework finished - and I don't want a detention from the teacher.

I'll update you as soon as I can get back to this one.

Monday, 5 August 2013

Design Wall Monday

I've been working on the animal quilt for my niece and almost all of the applique is finished. I need a dark purple thread which I'll pick up on Wednesday this week and then I'll have almost all the blocks finished - I still need to do her name and find her hand print.

Here's what's on my design wall this week - the completely finished blocks


Check out Patchworktimes to see what everyone else is working on.

Sunday, 21 July 2013

Animal Parade Applique

I have all the animals attached to the fabric so now I'm ready to stitch them on.
My friend L suggested I show exactly what I do to make these blocks so here goes:

1 - find a good image (since I can't draw that well); I use colouring pages I find on the internet and shrink or increase them in size as needed

2 - trace the image out on an adhesive product. I like Lite Steam A Seam 2 - it's tricky to find right now. If you want your image to be the same orientation as the original, trace from the wrong side of the image.

3 - adhere the steam a seam pieces to the fabric as needed. Then trim.

4 - layout the design. The steam a seam has a little tack to it so it will sit where I place it and is moveable until I iron it down. I use the original image as a guide to help with layout.


6 - add stitching lines to add definition - in this case it's the white chalk lines

7 - start satin stitching - I use a medium tear away stabilizer underneath to prevent waving. I use a bobbin weight thread (Wonderfil in this case) and a size 60 needle. I set my machine to zig zag with a stitch width of 2 and length of 0.2. I try to work from back to front in terms of depth - in this case I've done all the definition marks before going around the outside.

8 - some pictures of how close the needle is and how to do inside and outside curves. I set the needle to stop in the down position so I can move my fabric more easily. Going around tight curves is tricky and needs a lot of stop and start to keep the curve smooth.


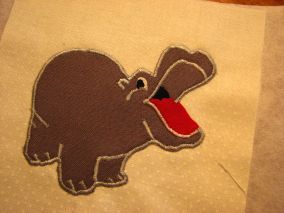
9 - all finished - except the eye, throat, and tongue - and I might add a few teeth but not as many as the original picture - too fussy to do that. I'll do those when I have that colour thread in the machine. I use a little fray check on the back side to prevent the satin stitching from coming undone and try to overlap seams as much as possible to lock them in.

10 - Finally, tear away the stabilizer. I haven't done that yet because this guy isn't quite finished.

And there you have it. It looks a lot more complicated, when I see all the pictures, than it is to actually do it. It does take time and I like my results. The details add interest and make the little critters seem more alive

On a side note, I painted my front room this morning, had a shower, then went out for breakfast. Sometime when I wasn't watching my cat jumped onto the window ledge with fresh paint on it and she left kitty paw prints


thankfully the paint was only a bit tacky and not totally wet so nothing seemed to be stuck to her paws.

Later in the afternoon the kitty got up in her usual position


right where I'd painted - at least it was dry by this time.

I'm going to have to barricade this section tomorrow when I paint again so she doesn't get up there.